
How to Organize Bulky Water Sports Gear in Your Garage
Table of Contents
- Why Bulky Water Sports Gear Gets Out of Control
- Step 1: Sort and Categorize Your Gear
- Step 2: Garage Storage for Kayaks and Paddleboards
- Step 3: How to Store Wetsuits Properly
- Step 4: Organizing Life Jackets and PFDs for Quick Access
- Step 5: Maximize Vertical Space for Bulky Water Sports Gear
- Weight Distribution and Structural Integrity
- Seasonal Gear Rotation and Inventory System
- Frequently Asked Questions
Last Updated: September 4, 2026
Kayaks, paddleboards, and wetsuits take up more garage space than almost anything else you own, yet most guides treat bulky water sports gear organization as an afterthought. A single kayak can consume as much floor space as a small car, and life jackets, paddles, and dry bags compound the clutter quickly. This guide from AdventureTrailhead walks through a system for reclaiming your garage while keeping expensive equipment safe, dry, and ready for the next boating season.
The core problem isn't a lack of space, it's treating all gear the same way, piling wet items on dry ones and storing heavy boards on unstable racks. Below, we'll show you how to sort, hang, hoist, and rotate your equipment so bulky water sports gear stops ruling your garage.
Why Bulky Water Sports Gear Gets Out of Control
Bulky water sports gear accumulates faster than standard equipment because it combines awkward dimensions, high moisture retention, and seasonal usage patterns.
A paddleboard is seven to ten feet long but only a few inches thick, making it nearly impossible to tuck into standard shelving (surfline.com). Wetsuits trap water and require airflow to dry, so stuffing them into a bin guarantees mildew. And because most people only use this gear a few months per year, it tends to get shoved into corners and forgotten until the next season arrives.
The result is a garage where you can't park your car, clutter spreads onto workbenches, and expensive equipment degrades. Tackling the problem requires treating organization as a system, not a one-time cleanup.
Step 1: Sort and Categorize Your Gear
Before you buy a single hook or shelf, empty everything out and sort it into categories. Group items by type: kayaks and paddleboards, paddles, life jackets and PFDs, wetsuits, dry bags, water toys, and safety equipment.
This shows you exactly what you own and forces you to decide what stays. Gear that's cracked, torn, or outgrown should be donated or discarded now, because storing broken equipment wastes the space you're trying to reclaim.
Separate Wet Gear from Dry Gear
The single most important sorting rule is separating wet gear from dry gear. Wetsuits, life jackets, and water shoes retain moisture and must dry completely before storage. Dry gear includes paddles, PFDs used only in clean conditions, dry bags, and accessories.
Wet gear needs open airflow and should never be sealed in plastic bins, as trapped moisture leads to mildew. Dry gear can tolerate enclosed storage but benefits from visibility. This separation drives every storage decision that follows.
Step 2: Garage Storage for Kayaks and Paddleboards
Kayaks and paddleboards are the heaviest, most awkward items you own, and they need dedicated storage rather than leaning against a wall, which stresses the hull and can cause permanent deformation.
Wall-mounted racks hold the boat horizontally with padded cradles that distribute weight evenly. Mount these into wall studs, never drywall alone, since a 60-pound kayak exerts significant pull on the hardware. Install racks high enough that the kayak sits above head level, freeing floor space below.
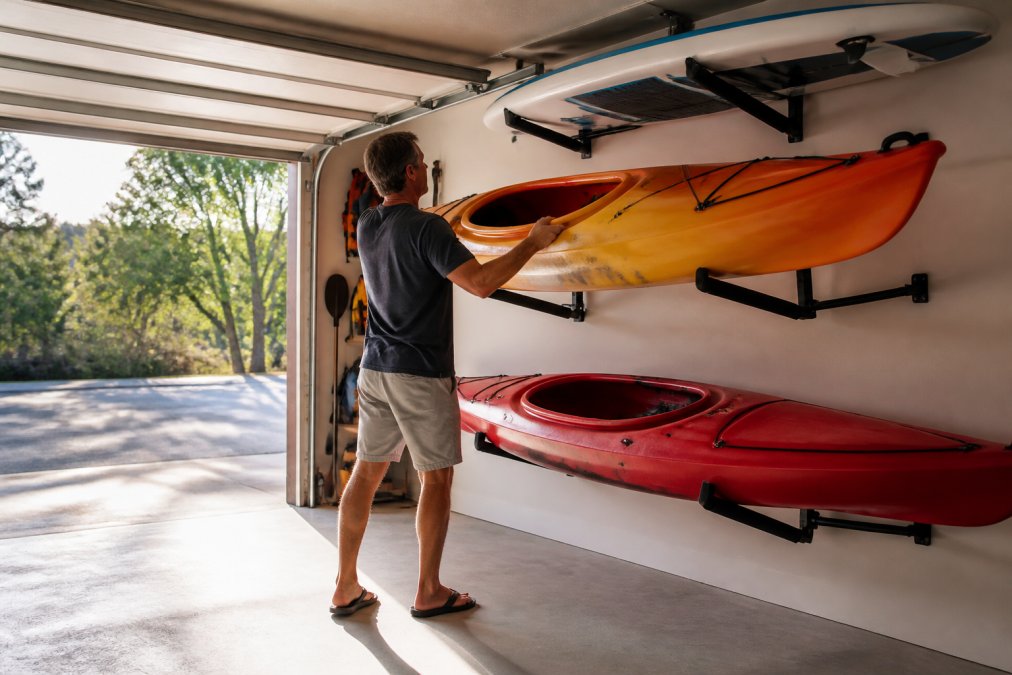
For paddleboards, heavy-duty hooks spaced to match the board's width allow vertical storage against the wall, keeping them out of the way and protecting the fins. Always clean and dry boards before mounting, since sand and salt accelerate wear on both the board and the storage system.
Step 3: How to Store Wetsuits Properly
Storing wetsuits properly is the difference between a suit that lasts a decade and one that smells after a single season. Always rinse wetsuits with fresh water after saltwater use, then hang them to dry in the shade on a wide, padded hanger.
Never hang a wetsuit on a thin wire hanger, which creates permanent shoulder bumps that compromise the neoprene's fit. Fold the suit over the hanger's bar instead of piercing the shoulders, and hang it in a well-ventilated area until completely dry.
Once dry, store wetsuits on a dedicated rack or fold them loosely in a breathable bin. Avoid tight folding, which creases neoprene, and direct sunlight, which degrades the material. A wall-mounted hook system in a shaded corner keeps them accessible without taking up shelf space.
Step 4: Organizing Life Jackets and PFDs for Quick Access
Life jackets and PFDs are safety equipment and need to be accessible in seconds, not buried under water toys. The Coast Guard requires life jackets be readily accessible on vessels, and the same logic applies to your garage: if you can't grab a PFD quickly, you're less likely to use it (uscg.mil).
Install a row of heavy-duty hooks at waist height near your garage's entry point. Assign one hook per family member and label them with names so everyone knows where their jacket lives, preventing the "whose jacket is this" confusion at the start of each trip.
For families with multiple PFDs, a wall-mounted rack that holds jackets flat, like a shallow shelf with dividers, keeps them visible and prevents foam from being crushed. Check jackets periodically for wear, since degraded foam and torn straps compromise flotation.
Step 5: Maximize Vertical Space for Bulky Water Sports Gear
Vertical storage is the single most effective strategy for bulky water sports gear because it converts unused wall and ceiling space into usable square footage. Floor space in a standard two-car garage is roughly 400 square feet, but wall space adds hundreds more. The catch is that water sports gear is heavy, awkward, and often wet, so mounting hardware and structural planning matter more than the rack itself.
Map your garage walls and identify blank areas above workbenches, near the ceiling, and along the back wall. These zones suit items you use less frequently, while frequently used gear should stay at eye level or below.
Wall-Mounted Racks and Heavy-Duty Hooks
Wall-mounted racks come in several forms. Wire shelving works well for dry bags, water toys, and accessories because it allows airflow and visibility. Heavy-duty hooks, rated for 50 pounds or more, handle paddles, life jackets, and coiled ropes.
Use a combination: a wire shelving unit for bins and baskets, with a row of hooks mounted beneath it for items you grab regularly. Group related gear together so everything for a kayaking trip lives in one zone.
Mounting Hardware: Studs, Anchors, and Load Ratings
The most common storage failure is mounting a 60-pound kayak rack into drywall with inadequate anchors. Drywall alone cannot support dynamic loads, the force exerted when you lift or shift gear. Every wall-mounted rack or hook must anchor into a wall stud or use heavy-duty anchors rated for the specific load.
For a kayak rack holding 60 to 80 pounds, use lag bolts at least three inches long driven into the stud, and distribute the load across multiple studs when possible (familyhandyman.com). A 12-foot kayak rack should span at least two studs, ideally three. Ceiling hoists must attach to ceiling joists, never to the drywall between them.
Ceiling Hoists and Pulley Systems
For the largest items, ceiling hoists and pulley systems offer the ultimate space-saving solution. A kayak or paddleboard hoisted flat against the ceiling frees the entire floor beneath it for parking or other storage.
Pulley systems let you raise and lower the load without lifting it overhead, which is valuable for heavy items difficult to lift onto high wall racks. Install the hoist into ceiling joists with rated hardware, and always test the system with the full weight before trusting it with your equipment.
A common mistake is using a hoist rated for static weight without accounting for the dynamic load when gear swings during raising and lowering. A 60-pound kayak can exert 100 pounds or more during a swing. Choose a hoist rated for at least 1.5 times your gear's weight, and use a rope with a working load limit that exceeds the total.
Weight Distribution Across the Structure
Garage storage failures almost always trace back to poor weight distribution or undersized hardware. When you mount heavy gear on walls and ceilings, you're asking the structure to hold weight it wasn't designed for, so the mounting system matters as much as the storage product.
For freestanding shelving units, secure tall units to the wall with anti-tip brackets and place the heaviest bins on the bottom shelves. A loaded unit with 100 pounds of wet gear concentrated at the top can tip forward. The same principle applies to wall-mounted systems: spread heavy items across multiple mounting points rather than concentrating them on one rack.
The Load Test Protocol
Before trusting any new mounting system, perform a load test. Install the rack or hoist, then hang the heaviest item you plan to store. Gently pull and shift the load to simulate real-world conditions, checking for movement, creaking, or visible flex. If anything moves, reinforce the mounting before using the system. This five-minute test prevents the most common storage accidents.
Weight Distribution and Structural Integrity
Garage storage failures almost always trace back to poor weight distribution or undersized hardware. When you mount heavy gear on walls and ceilings, you're asking the structure to hold weight it wasn't designed for, so the mounting system matters as much as the storage product.
Seasonal Gear Rotation and Inventory System
Bulky water sports gear is seasonal for most people, competing for space with camping gear, snow sports equipment, and tools. A seasonal rotation system ensures only the gear you currently need occupies prime storage space.
At the start of the boating season, move water sports gear to the most accessible zones. At season's end, rotate it to higher or deeper storage and bring cold-weather gear forward. This takes about an hour twice a year but keeps your garage functional year-round.
An inventory system prevents you from buying duplicates of gear you already own. A simple list on your phone or a whiteboard on the garage wall tracking what you have, where it's stored, and its condition works well for most households. For larger collections, labeled bins with contents listed on the outside let you find a specific item without opening every container.
Garage organization for bulky water sports gear comes down to three principles: separate wet from dry, go vertical before going horizontal, and anchor everything to the structure. Start with the sorting step today, then tackle one storage zone at a time. Within a weekend, you can transform a cluttered garage into a functional staging area where every piece of gear has a home. For the dry bags and waterproof storage that keep your gear protected between outings, AdventureTrailhead carries a full range of water sports essentials designed for reliable, long-term storage.
Getting bulky water sports gear organized doesn't require a garage renovation or a custom storage system. By sorting wet from dry, mounting kayaks and paddleboards on walls and ceilings, and building a simple seasonal rotation, you can reclaim your garage and extend the life of your equipment. AdventureTrailhead supports this effort with waterproof dry bags, including the EcoGear FX Voyager 30L at $34.99 and the Roll Top Dry Bag at $17.99, plus large-capacity backpacks that keep your gear protected between trips. Get started with AdventureTrailhead and make your garage work as hard as you do.

Frequently Asked Questions
How do I keep bulky water sports gear accessible yet out of the way?
The most effective approach is to assign a permanent home for each item based on how often you use it. Install wall-mounted racks for kayaks at shoulder height so you can slide them off without heavy lifting. Use ceiling hoists for paddleboards and reserve lower hooks for life jackets. This keeps bulky water sports gear off the floor while leaving the center of your garage open for vehicles and daily activities.
What is the best way to store wetsuits to prevent mold?
Always rinse wetsuits with fresh water after saltwater use, then hang them inside out on a wide, padded hanger in a shaded, well-ventilated area. Once completely dry, fold them loosely and store them in a breathable cotton bag or a plastic bin with ventilation holes. Never store wetsuits damp or in direct sunlight, since both promote mildew and degrade the neoprene.
Should I store life jackets hanging or folded?
Hang life jackets on heavy-duty hooks or a dedicated PFD rack so air circulates around them and they keep their shape. Folding or compressing them under other gear can crush the foam and reduce buoyancy over time. Make sure the storage spot is dry and away from direct sunlight, which can weaken the outer fabric. Check each PFD before the boating season starts to confirm the straps and buckles still work properly.
How much weight can garage wall racks hold for kayaks?
Heavy-duty wall-mounted racks designed for kayaks typically support between 75 and 150 pounds per pair when anchored into wall studs. Before installing, check the weight rating on your specific rack and confirm your drywall anchors are rated for that load. A single kayak generally weighs 40 to 80 pounds, so most racks handle one boat per pair. If you store two kayaks, use separate mounting points rather than stacking them on one set of racks.
This article was written using GrandRanker