
How to Pack Camping Gear Efficiently
Table of Contents
- What You'll Need Before Packing
- How to Pack Camping Gear Weight Distribution
- Building Your Camping Packing Checklist
- Step-by-Step Packing Process
- How to Store Camping Gear at Home
- Packing for Extreme Weather Conditions
- Common Packing Mistakes to Avoid
- Digital Inventory Management for Gear
- Frequently Asked Questions
Last Updated: September 1, 2026
What You'll Need Before Packing
Before touching your camping gear, take inventory of what you actually own. Gather everything in one place, tent, sleeping bag, stove, cookware, clothing, and safety equipment, to confront what you have versus what you need.
According to the Leave No Trace Center for Outdoor Ethics, proper planning and packing prevents both environmental damage and personal safety issues. At AdventureTrailhead, we recommend creating a master gear list organized by category: shelter, sleep system, cooking, clothing, safety, and personal items. Adjust based on trip duration, weather, and destination.
Check your gear's condition before packing. Inspect seams, zippers, and fabric. Test your stove at home. Charge your headlamp. These small checks prevent disasters on the trail.
How to Pack Camping Gear Weight Distribution
Weight distribution determines fuel efficiency, vehicle stability, and gear accessibility. Pack by physics, not convenience.
Understanding Load Capacity and Vehicle Space
Every vehicle has a weight limit. Check your owner's manual for maximum payload capacity. Exceeding this limit stresses your suspension, reduces fuel efficiency, and increases braking distance. Calculate your total gear weight before loading using a bathroom scale for major items. If you're approaching your vehicle's limit, make cuts.
Space matters as much as weight. The American Camping Association's gear selection guidelines emphasize that compact, multipurpose gear reduces both weight and volume. Consider upgrading to a 90L Waterproof Hiking Camping Backpack from AdventureTrailhead (priced at $79.99) if you're frequently frustrated by space constraints.

Organize your vehicle like a puzzle. Heavy items go low and centered. A low center of gravity improves handling and fuel economy.
Positioning Gear for Fuel Efficiency
Load distribution directly affects fuel consumption. Place your heaviest items, coolers, water containers, dense gear, directly over the rear axle or slightly forward to maintain the vehicle's natural balance.
Roof racks and cargo boxes create wind resistance. Avoid them when possible. A boxy cargo carrier on your roof can reduce fuel efficiency by 5-10%, which compounds over long distances.
Distribute weight side to side evenly. Packing everything on one side creates handling issues, especially in crosswinds or during emergency maneuvers.
Building Your Camping Packing Checklist
A solid checklist prevents the panic of forgotten essentials. Generic lists include items you don't need while missing things specific to your trip.
Essential Categories and Gear Inventory
Organize your checklist into core categories: shelter, sleep system, clothing, cooking and nutrition, water and hydration, safety and emergency gear, and personal items.
Shelter includes your tent, stakes, guylines, and repair kit. Sleep system covers your sleeping bag rated for expected temperatures, sleeping pad, and pillow if you bring one. Clothing should include base layers, insulating layers, rain protection, and extra socks. Most discomfort comes from inadequate clothing choices.
Cooking and nutrition means your stove, fuel, cookware, utensils, and food. Water and hydration includes containers, purification method, and electrolyte supplements. Safety and emergency gear is non-negotiable: first aid kit, headlamp with extra batteries, map, compass or GPS, fire-starting materials, emergency shelter, and a whistle.
Create a master inventory spreadsheet listing every item, its weight, dimensions, and category. Modify it based on season and destination, but maintain a core list you can quickly customize.
Packing for Different Trip Durations
For weekend trips (2-3 days): Bring one set of hiking clothes, one camp set, and one backup outfit. One pair of hiking boots plus camp shoes. Minimal food. A single water container. Simplified first aid kit.
For week-long trips (5-7 days): Bring two sets of hiking clothes, two camp outfits, and two backup outfits. Two pairs of hiking boots. Full food supply. Multiple water containers or reliable filtration. Comprehensive first aid kit with blister treatment. Extra fuel.
For extended expeditions (10+ days): Multiple sets of everything. Full food resupply at midpoint if possible. Comprehensive repair kit. Extra batteries. Backup navigation tools. A 90L Waterproof Hiking Camping Backpack provides the capacity you need without excessive weight.
Longer trips require more redundancy. You can't run to town for replacement socks on day six of a backcountry trip.
Step-by-Step Packing Process
The actual packing follows a logical sequence. Start with the foundation and build systematically.
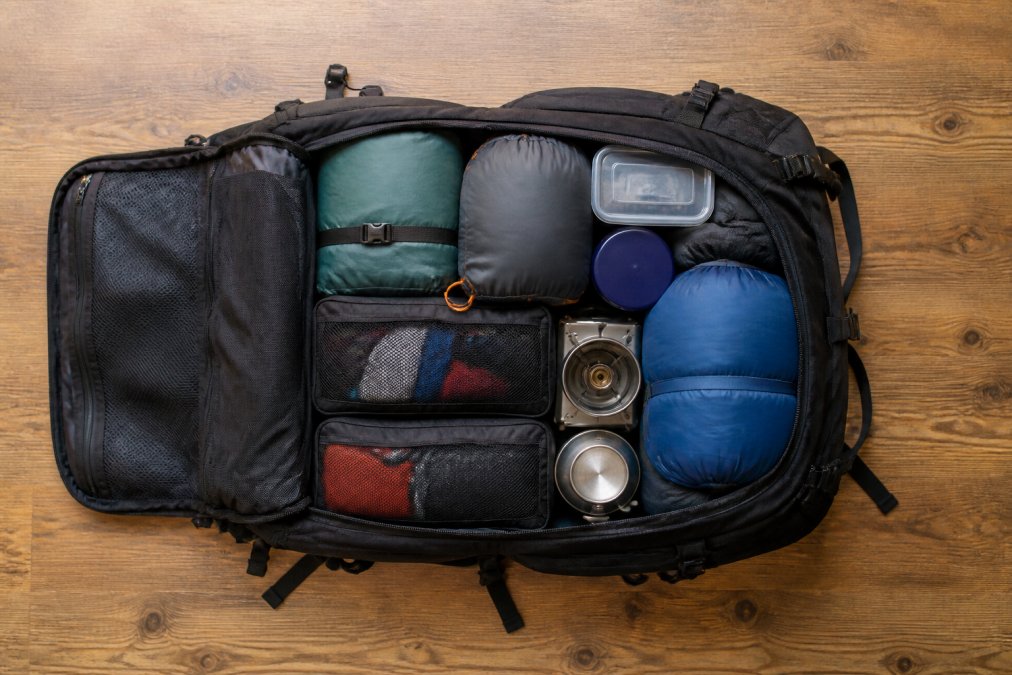
Organizing Gear with Storage Bins and Packing Cubes
Packing cubes and storage bins compress gear and create visual organization. Use color-coded or labeled cubes for each category: clothing in one, cooking gear in another, toiletries in a third. This system saves time when you need something during camp setup.
Compression works by removing air. Roll your clothing instead of folding it. A sleeping bag compressed into its stuff sack takes up roughly one-quarter the space of a loose sleeping bag.
Waterproof containers protect gear from rain and water crossings. Separate critical items, fire-starting materials, first aid kit, maps, into waterproof bags. A 30-35L Large-Capacity Hiking Backpack from AdventureTrailhead ($75.99) pairs perfectly with compression cubes for day hikes and weekend trips.
Modular Packing for Easy Access
Pack your backpack in layers, with the most frequently accessed items on top or in external pockets. Your rain jacket should be accessible without unpacking everything. Snacks and water should be within arm's reach.
Heavy items go at the bottom and center of your pack, against your back. This position distributes weight closest to your body's center of gravity. Never pack heavy items at the top.
Mid-pack holds your sleep system and clothing. Top of pack holds your first aid kit, snacks, and items you'll need before setting up camp. External pockets store your water bottle, headlamp, and map.
Test your pack's organization on a short hike before a major trip. Rearrange based on actual usage patterns, not theoretical ones.
How to Store Camping Gear at Home
Storage between trips determines how long your gear lasts. Proper storage prevents mold, fabric degradation, and mechanical failure.
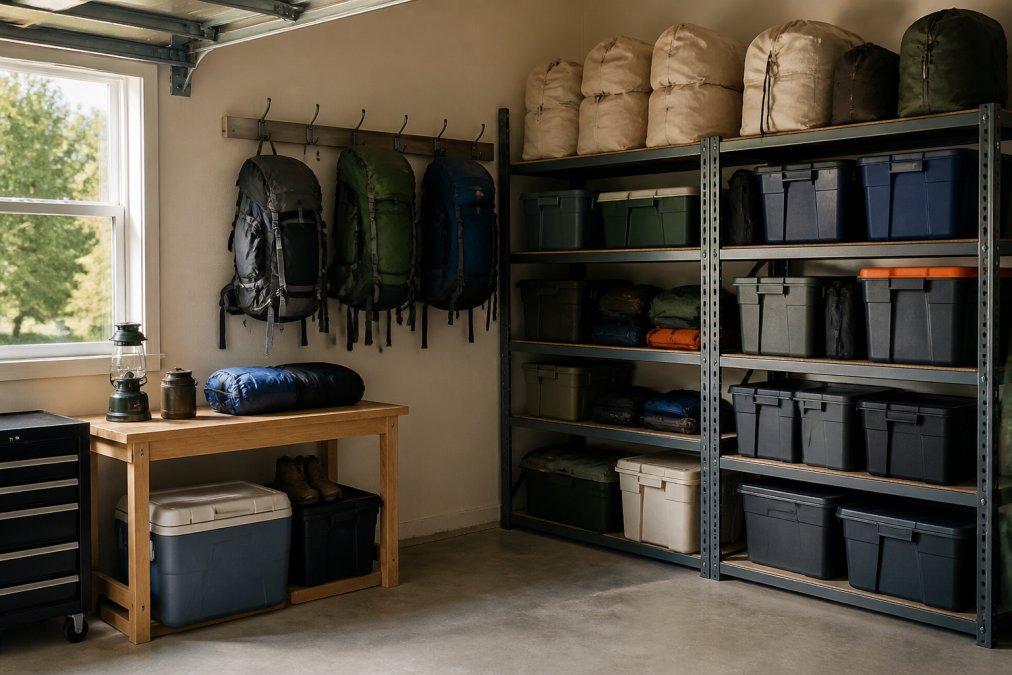
Vertical Storage and Shelving Solutions
Wall-mounted shelving maximizes garage or basement space. Install shelves at varying heights to accommodate different gear sizes. Store lightweight items on upper shelves, heavier items below.
Hang backpacks on wall hooks rather than storing them flat to prevent permanent creases. Tents should be stored loosely in breathable cotton bags, never in plastic. Plastic traps moisture and promotes mold growth.
Store sleeping bags in large mesh bags or hang them loosely. Never compress them for long-term storage. Compression damages the insulation's loft. A sleeping bag compressed for six months loses significant warmth retention.
Gear Maintenance and Pre-Trip Inspection
Before every trip, conduct a thorough inspection. Check tent seams for damage. Test all zippers. Inspect your sleeping bag for tears. Check your backpack's straps and attachment points.
Clean gear after each trip before storing. Remove dirt, salt, and debris. Dry everything completely. Mold develops in damp environments.
Inspect your stove and fuel system for rust or damage. Test it at home before relying on it in the field. Replace batteries in headlamps. Check water filtration cartridges for expiration dates. Replenish anything you consumed on your last trip.
According to the National Park Service's pre-trip planning guidance, proper maintenance extends gear lifespan and prevents safety issues.
Packing for Extreme Weather Conditions
Extreme weather demands specific packing strategies.
For cold weather: Bring extra insulating layers. Your sleep system must be rated for expected low temperatures. Include hand warmers and foot warmers. Pack a backup insulating layer that stays in your pack as insurance.
For hot weather: Bring significantly more water than you think you'll need. Pack a wide-brimmed hat, sunglasses, and high-SPF sunscreen. Light-colored, breathable clothing reflects heat.
For wet conditions: Waterproof containers for electronics and critical items. Rain jacket and rain pants. A ground tarp under your tent prevents water seeping from below. Waterproof bag for your sleeping bag.
Extreme weather packing means carrying redundancy you hope you won't need. The backup insulating layer, extra water container, and emergency shelter become essential when conditions deteriorate.
Common Packing Mistakes to Avoid
Most packing failures follow predictable patterns.
Overpacking "just in case" items. That second tent, backup stove, and extra cookware add weight without solving real problems. Pack for your actual trip, not an imaginary worst-case scenario.
Ignoring weight distribution. Packing heavy items at the top or on one side creates an unstable load. Correct it before you start hiking.
Bringing too much clothing. You need fewer clothes than you think. Layers matter more than quantity. Five shirts, one pair of pants, and strategic layering beats ten shirts and two pairs of pants.
Failing to test your pack. Never load a new packing system and immediately leave for a week-long trip. Test it on a weekend hike first.
Packing food without a plan. Bring meals you'll actually eat. Test your food choices on day hikes before committing to longer trips.
Neglecting gear maintenance. A tent that leaks, a stove that doesn't light, or a sleeping bag with compromised insulation compounds during your trip. Inspect everything before you leave.
Digital Inventory Management for Gear
Modern gear management goes beyond paper checklists. Spreadsheets work well for basic inventory. Create columns for item name, category, weight, dimensions, purchase date, maintenance notes, and trip history.
Smartphone apps designed for outdoor gear management offer more sophisticated features. Some apps calculate total pack weight, flag items needing maintenance, and let you create trip-specific packing lists.
Take photos of your packed backpack and organized vehicle. Visual documentation helps you replicate successful packing systems. Document gear failures and maintenance to inform future purchasing decisions.
Efficient packing transforms camping from a logistical nightmare into an enjoyable experience. Start with a solid checklist, understand weight distribution, invest in quality storage solutions like those available at AdventureTrailhead, and conduct thorough pre-trip inspections. Your future self will thank you when you're setting up camp smoothly instead of searching frantically for a critical item buried in your pack.
Frequently Asked Questions
How do you balance weight in a camping backpack?
Place heavier items like your sleep system and shelter near the center of your pack, close to your back. Position medium-weight gear (cooking equipment, food) in the middle sections, and lighter items toward the top and sides. Keep your pack's weight distributed evenly left to right to prevent strain. For vehicle packing, place heavier gear over the rear axle and distribute weight across the cargo floor to maintain fuel efficiency and handling.
What should go at the bottom of a camping pack?
Pack your sleeping bag, tent, and other bulky but essential items at the bottom. These form a stable base for your backpack. Follow with heavier items like food and water, then add mid-weight gear. Reserve the top section for items you'll access frequently during your trip. This arrangement keeps your center of gravity stable and makes your pack comfortable to carry.
What is the best way to organize small camping gear items?
Use packing cubes and labeled storage bins to group similar items: one for cooking utensils, another for first aid and safety gear, and separate cubes for clothing by type. Assign each category a specific color or label for quick identification. Store small items like rope, carabiners, and repair tools in compartments within your backpack. This modular approach saves space and makes it easy to find what you need without unpacking everything.
How do you pack camping gear efficiently for different trip lengths?
For overnight trips, pack a 30-35L backpack with essentials: shelter, sleep system, food, and water. For 2-3 day trips, upgrade to a 60-90L pack and add extra clothing and food. Longer expeditions require 90L+ capacity with additional gear rotation planning. Use your camping packing checklist to identify what changes with trip duration, and adjust storage accordingly. Prioritize accessibility for items you'll use daily, keeping them at the top or in side compartments.
This article was written using GrandRanker