
What Is a Belay Device and How It Works: 2026 Guide
Table of Contents
- What a Belay Device Is and Why It Matters
- How a Belay Device Works: Rope Path and Friction
- Types of Belay Devices: Tube, Plate, and Assisted Braking
- How to Use a Belay Device: Step-by-Step
- Belay Device Safety: Checks, Errors, and Assisted-Braking Limits
- Matching Rope Diameter and Device to Your Climbing Scenario
- Conclusion
- Frequently Asked Questions
Last Updated: October 6, 2026
What a Belay Device Is and Why It Matters
A belay device is climbing hardware that adds friction to the rope so a belayer can hold a falling climber. It is not a brake on its own, it is a tool that lets your hand control the rope.
This guide from AdventureTrailhead covers rope path, friction, device types, and the safety habits that keep partners alive.
When your partner falls, the rope runs through your device and your brake hand.
Key Terms Every Belayer Needs to Know
- Belayer: The person holding the rope and catching falls.
- Climber: The person on the wall.
- Brake strand: The rope section running from the device to your brake hand.
- Brake hand: The hand that grips the brake strand to stop the rope.
- Rope slack: The loose rope between belayer and climber.
- Belay loop: The strong fabric loop on a harness where the device connects.
- Locking carabiner: A carabiner with a screw gate or auto-lock that secures the device.
How a Belay Device Works: Rope Path and Friction
A belay device works by forcing the rope through a tight, curved path. That bend creates friction, which turns your hand strength into enough braking force to stop a fall.

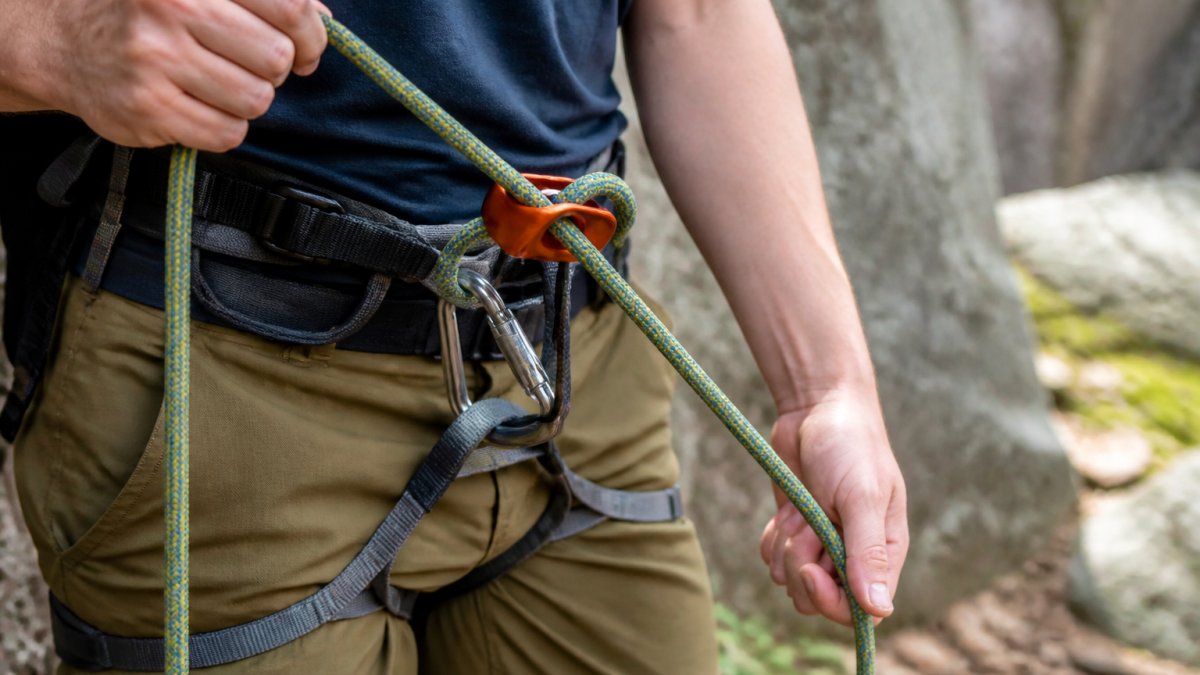
Here is the rope path in a basic tube-style device:
- The rope leaves the climber and runs up to the anchor or first piece of protection.
- It comes down to the belayer.
- It feeds through the device, bending sharply around the metal.
- The brake strand exits and drops toward the brake hand.
Why the Bend Does the Work
Three variables decide how much friction a device generates:
- Angle of wrap. A rope that turns 180 degrees through a device grips far harder than one that barely grazes the metal. This is why the brake strand must run down and away from the device, not straight back toward the climber.
- Bend radius. A tighter curve concentrates pressure on a smaller area of rope and metal, increasing friction. Tube devices with narrow slots and assisted-braking devices with shaped grooves exploit this.
- Rope-to-metal and rope-to-rope contact. In a tube device the two strands of rope press against each other inside the slot, adding friction beyond what the metal alone provides.
The harder the rope pulls, the more it binds against the device, passive braking, with no moving parts. A tube or plate device has no cam, no spring, nothing to fail mechanically; its braking capacity comes from geometry and your hand.
How the Brake Hand and Brake Strand Catch a Fall
The brake hand does the real work. When a climber falls, the rope snaps tight and your job is to keep the brake strand angled down and gripped.
Three things happen at once:
- The device redirects the rope into a sharp bend.
- The bend creates friction that slows the rope.
- Your brake hand locks the strand in place.
If your brake hand is off the rope, the device alone will not hold a hard fall. Tube and plate devices are manual, they need you. Even assisted-braking devices, which pinch the rope under load, assume a brake hand is present. The cam assists; it does not replace technique.
Reading the Rope Path on Any Device
When you pick up an unfamiliar device, trace the rope before you trust it. Manufacturers mold a diagram on the device: the climber's strand enters one side, the brake strand exits the other, and the strands run parallel or cross in a specific orientation. If they are not sitting in the slots as shown, the device will not generate its rated friction.
Types of Belay Devices: Tube, Plate, and Assisted Braking
There are three main types of belay devices, each handling friction differently.
Tube-style devices are the most common. The rope feeds through two parallel slots.
Plate-style devices are the old-school design: the rope wraps around a metal plate. They work but twist the rope and offer less control on rappel.
Assisted-braking devices add a cam or shaped slot that grabs the rope when it loads, helping catch a fall if the belayer reacts slowly.
| Device Type | How It Brakes | Best For | Brake Hand Needed |
|---|---|---|---|
| Tube-style | Rope bend and friction | Sport and trad climbing | Yes, always |
| Plate-style | Rope wrap on metal | Basic top-rope setups | Yes, always |
| Assisted braking | Cam or shaped slot grips rope | Lead climbing, beginners | Yes, still required |
How to Use a Belay Device: Step-by-Step
Using a belay device takes practice, but the steps are simple. Follow this sequence every time.
- Check your gear. Inspect the device, carabiner, harness, and rope for wear.
- Thread the rope through the device exactly as the maker's diagram shows.
- Clip the device to your belay loop with a locking carabiner. Lock the gate.
- Tie in and run a partner check with your climber.
- Set your brake hand on the brake strand, palm down.
- Feed slack with your guide hand while keeping the brake hand anchored.
- Lock off by pulling the brake strand down and back to catch a fall.
- Lower or rappel using slow, controlled hand movements.
The American Alpine Club's climbing safety resources stress partner checks before every climb.
Rock Climbing O Shape Thread Lock Carabiner →

Lowering a Climber and Rappelling
Lowering a climber means letting rope out slowly while your brake hand controls the speed. Never let go to speed things up. Ease the strand through your fingers.
Rappelling, also called abseiling, uses the same device to descend a rope. You control speed with your brake hand. Add a backup friction knot below the device for extra safety.
Belay Device Safety: Checks, Errors, and Assisted-Braking Limits
Belay device safety comes down to habits, not luck. The UIAA safety standards for climbing equipment set the testing rules that good gear must pass, and manufacturers publish rope diameter ranges and use instructions that assume those standards. Reading and following the maker's instructions is not optional paperwork; it is the difference between a device working as tested and a device working as a guess.
Run these checks before every climb:
- Device threaded correctly per the maker's diagram
- Locking carabiner gate fully closed and loaded on the spine, not the gate
- Harness buckles doubled back and tight
- Rope diameter matches the device's rated range
- Knots dressed and tails long enough
- Brake hand on the strand at all times
Common belaying errors we see:
- Threading the device backward
- Letting the brake hand drift off the rope
- Standing too far from the wall, which adds slack
- Feeding rope too fast on lead
- Holding an assisted-braking device open with the thumb, which defeats the cam
- Using a rope outside the device's rated diameter range
Assisted Braking Is Not Automatic Fall Protection
This is the most misunderstood point in belaying. An assisted-braking device uses a cam or shaped slot that pinches the rope when it loads, which can slow or stop a fall even if the belayer reacts slowly, but it is not a hands-free brake. It can fail to engage if the rope is too thin, icy, wet, or muddy, if the device is held open, or if the rope is loaded in a direction it was not designed for.
Rope Diameter and Device Compatibility
Rope diameter and device compatibility matter more than most climbers think. A device rated for 9.5 to 10.5 mm rope will not grip a thin 8 mm line the same way, and one rated for 8.9 to 10.5 mm may feel grabby on a fat 11 mm gym rope. Outside the rated range, the wrap angle and cam geometry no longer produce the friction the device was tested to deliver. A few practical rules:
- Match the rope's actual diameter, not the nominal number on the packaging, to the device's rated range.
- A worn, fuzzy, or flattened rope can behave differently than a new one of the same diameter.
- Half and twin ropes are thinner than single ropes and require a device rated for them.
- When in doubt, follow the device instructions over internet advice.
Inspection, Wear, and Retirement
Belay devices are consumable gear, not lifetime purchases. Check yours before every use for:
- Deep grooves worn into the metal where the rope runs
- Sharp edges, burrs, or cracks
- A cam that no longer moves freely or springs back
- A carabiner with a sticky gate or worn threads
Most manufacturers publish a retirement guide and maximum service life; the general rule is to retire any device with deep wear, damage, or a history of a severe fall. Cleaning is usually limited to warm water and mild soap followed by air drying, solvents and lubricants can damage coatings unless the maker says otherwise. When a device is retired, cut, mark, or destroy it so it cannot be mistaken for safe gear later.
Matching Rope Diameter and Device to Your Climbing Scenario
Match your setup to the climb:
- Top-rope climbing: A tube-style device with a 10 mm single rope is simple and reliable.
- Lead climbing: An assisted-braking device gives extra margin when falls are longer.
- Mountaineering: A lightweight tube or plate device pairs well with half or twin ropes.
- Rappelling: A device with good friction control, plus a backup hitch, keeps descents smooth.
At AdventureTrailhead, we carry climbing hardware built for these scenarios, including our Outdoor climbing rope10M with a 10 mm polyester sheath and a Rock Climbing O Shape Thread Lock Carabiner for secure device attachment.

The right belay device is the one that matches your rope, your harness, and your climbing style. No single device fits every scenario.
Conclusion
Before a big route, every climber faces the same question: is my gear and technique ready? A belay device only works when it is matched to your rope, checked before every climb, and backed by a brake hand that never leaves the strand.
At AdventureTrailhead, we stock the climbing and mountaineering gear that keeps partners safe on the wall. Our Outdoor Safety Belt Climb Rock Safety Harness pairs with our 8mm Predator Rope for technical setups. Get started with AdventureTrailhead and climb with total confidence.
Frequently Asked Questions
What is the most popular belay device?
Tube-style devices are the most common because they are light, inexpensive, and work for both top-rope and lead climbing. They feed rope smoothly and handle a wide range of rope diameters. Assisted-braking devices have grown popular with gym climbers and beginners because they help hold a fall if the brake hand slips. Many climbers own one of each and switch based on the route.
Does a belay device lock automatically?
Only assisted-braking devices add any automatic help, and even those are not fully automatic. They use a cam or geometry that pinches the rope when it loads, which slows a fall. You still hold the brake strand at all times. Tube and plate devices offer no automatic locking at all, so your brake hand does all the work. Treat every device as manual and keep your hand on the rope.
Can a small person belay a big person?
Yes, with the right technique and device. A lighter belayer can be pulled off the ground during a hard catch, so many climbers anchor the belayer or use an assisted-braking device for extra holding power. Keep the brake hand locked, stand close to the wall, and let the rope run through the device instead of fighting the fall with your body weight.
How do I know which rope diameter works with my belay device?
Check the manufacturer's listed rope range for your device before you buy. Tube and plate devices usually accept a wider range, while assisted-braking devices are pickier and can slip on ropes that are too thin. A 10mm rope pairs well with most tube devices, and an 8mm line suits lightweight rappel setups. Match the rope and device on paper first, then test the feed on flat ground.