
How to Use an Ice Axe for Self-Arrest: Step-by-Step
Table of Contents
- What You Need Before You Practice Self-Arrest
- The Self-Arrest Grip: Hand Placement That Saves Lives
- Step-by-Step: How to Use an Ice Axe for Self-Arrest
- Ice Axe Self-Arrest Practice: Drills That Build Reflexes
- Self-Arrest With Crampons Risks: When Points Work Against You
- How to Choose an Ice Axe for Mountaineering
- Common Mistakes That Break a Self-Arrest
- Conclusion
- Frequently Asked Questions
Last Updated: September 16, 2026
What You Need Before You Practice Self-Arrest
Before you can learn how to use an ice axe for self-arrest, you need the right setup: a snow slope with a safe runout, an ice axe sized to your body, and the discipline to practice the motion until it becomes reflex. This guide from AdventureTrailhead walks you through the grip, the roll, and the drills that turn a panic response into muscle memory.
Here's what you need before your first practice session:
- An ice axe with a sharp pick and a functional adze. Dull picks skid instead of biting.
- Crampons and a helmet. You'll be practicing on real snow with real points.
- A slope with a clean, obstacle-free runout. No rocks, no crevasses, no trees.
- Soft to moderately firm snow. Ice won't let the pick set; deep powder won't let you build speed.
The Self-Arrest Grip: Hand Placement That Saves Lives
The self-arrest grip is a two-handed hold with your dominant hand over the axe head and your non-dominant hand on the shaft near the spike. The pick points backward toward your shoulder, and the adze faces forward.

Here's exactly how to set it:
- Dominant hand over the head. Thumb under the adze, palm on top of the head, fingers wrapping the pick side.
- Non-dominant hand on the shaft. Grip near the spike, about a hand's width from the bottom.
- Pick points toward your shoulder. Not out to the side, not forward. Toward your body.
- Axe lies diagonally across your chest. Head near your dominant shoulder, spike near your opposite hip.
Step-by-Step: How to Use an Ice Axe for Self-Arrest
Learning how to use an ice axe for self-arrest comes down to three movements: roll onto your stomach, drive the pick, and hold until you stop. Each one has to happen in sequence, without hesitation.
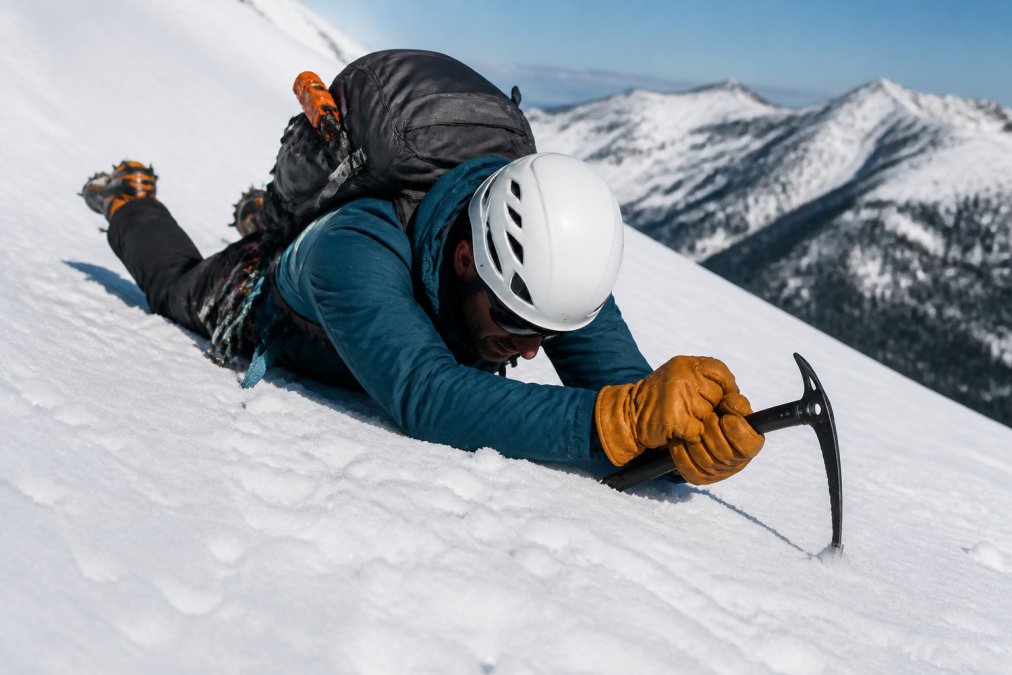
Step 1: Roll Onto Your Stomach and Get Into Position
Roll toward the head of the axe, not away from it. If you're sliding headfirst, roll onto your stomach and get your feet downhill. If you're sliding feet-first, roll onto your stomach and get your head uphill.
Step 2: Drive the Pick Into the Snow and Shift Your Weight
Pull the axe head toward your opposite shoulder and push down with your body weight. The pick should bite into the snow just above your shoulder. Your non-dominant hand pulls the shaft toward your hip to add use.
Step 3: Hold the Brake Until You Stop, Then Assess
Once the pick bites, hold the position. Your body will want to roll back onto its side. Fight it. Keep your chest on the snow, your weight on the axe head, and your feet downhill.
Ice Axe Self-Arrest Practice: Drills That Build Reflexes
The best ice axe self-arrest practice is repetitive and boring: slide, arrest, reset, repeat. But the order you practice in matters as much as the repetitions. Build the reflex in layers, and don't move to the next layer until the current one is automatic.
Layer 1: Static Grip and Roll on Flat Ground
Before you ever slide, lie on flat snow in the self-arrest position and rehearse the roll. Start on your back, feet downhill, and roll toward the axe head until your chest is on the snow and the pick is set. Do this 20 times per side. You are training the roll, not the arrest.
Layer 2: Slow Slides on Gentle Terrain
Find a slope shallow enough that you can stop with body friction alone. Slide feet-first on your back, roll, and press the pick. The goal is not speed, it is making the roll happen without a conscious decision. Ten to fifteen repetitions per orientation per session is a reasonable target.
Layer 3: All Four Fall Orientations
You don't get to choose how you fall, so drill every orientation:
- Headfirst, face down. Roll onto your stomach and arrest.
- Feet-first, on your back. Roll onto your stomach and arrest.
- Headfirst, on your back. Roll onto your stomach and arrest.
- Feet-first, face down. Roll onto your stomach and arrest.
Layer 4: Add the Pack
Practice with your pack on, and load it to the weight you actually carry. A weighted pack raises your center of gravity and shifts it backward, which makes the roll slower and the pick-set weaker. Most practitioners find that a heavy pack adds roughly a half-second to the roll and requires a more deliberate weight shift onto the axe head.
Outdoor Safety Belt Climb Rock Safety →
Layer 5: Change the Snow
Snow density changes the arrest more than most people expect. On soft spring slush, the pick sinks deep and the shaft drags, so you need a longer slide to stop. On hard-packed névé or firm windboard, the pick skates unless you press it in with your full body weight and keep your chest low. Practice on both.
Self-Arrest With Crampons Risks: When Points Work Against You
Self-arrest with crampons risks turning a controlled stop into a broken ankle. The mechanism is simple: crampon points are designed to bite, and on a fast slide they bite into the snow surface while your body keeps moving. Your leg stops; the rest of you doesn't. The result is a twisted knee, a fractured ankle, or a spiral fracture of the lower leg.
Front Points vs. Horizontal Points
Front points are more aggressive and catch faster, which makes them more dangerous during a slide. Horizontal points are less likely to catch but still can. Neither design eliminates the risk, only foot position does.
What to Do If a Point Catches
If you feel a point catch mid-slide, don't fight it by straightening your leg. Roll with the catch, keep your weight on the axe, and let the leg follow the slide rather than anchoring it. Fighting the catch is what converts a snag into a fracture.
How to Choose an Ice Axe for Mountaineering
Choosing an ice axe for mountaineering comes down to length, head shape, and shaft material. Length is the most important, and it's the one most people get wrong.
Head shape matters too:
- Pick and adze. The classic general-mountaineering setup. The pick bites; the adze chops steps and clears snow.
- Pick and hammer. Better for mixed terrain and ice, where you need to pound in pitons.
- Curved pick. Bites more aggressively on steep ice but is harder to use for self-arrest on soft snow.
Common Mistakes That Break a Self-Arrest
Most failed self-arrests come down to one of five mistakes. Fix these and your odds improve dramatically.
| Mistake | What Happens | The Fix |
|---|---|---|
| Rolling the wrong way | Axe ends up under your body | Roll toward the axe head, not away |
| Stabbing instead of pressing | Chest lifts, friction drops | Press the pick down with body weight |
| Planting crampons | Leg catches, ankle twists | Lift feet off the snow during arrest |
| Gripping the shaft only | No use on the pick | Dominant hand on the head, always |
| Practicing only one orientation | Reflex fails in a real fall | Drill all four fall positions |
Conclusion
The gap between a scare and a serious accident on a snow slope is often a single, well-practiced motion. Self-arrest isn't complicated, but it has to be automatic, and automatic only comes from repetition on real snow with real gear.
Frequently Asked Questions
How do you perform self-arrest with an ice axe?
Roll onto your stomach, keep your head uphill, and hold the axe diagonally across your chest with one hand on the head and the other on the shaft. Drive the pick into the snow near your shoulder, then shift your body weight over the axe head. Keep your legs spread and toes pointed down to limit acceleration. The ice axe self-arrest works because your body weight pushes the pick deeper into the snow with every meter of slide.
How do you practice self-arrest safely?
Start on a moderate snow slope with a safe runout, ideally one that ends in a flat basin rather than rocks or a crevasse. Wear a helmet and gloves, and remove crampons if the snow is firm so the points do not catch. Practice ice axe self-arrest practice drills in soft snow first, then progress to firmer conditions. Have a partner spot you and check the slope angle before each run.
Can you perform a self-arrest while wearing crampons?
Yes, but self-arrest with crampons risks catching a point in firm snow or ice, which can flip you or break an ankle. On hard snow, keep your feet up and rely on the axe. On soft snow, you can use your knees and toes for extra traction. If you are sliding headfirst, roll onto your stomach before driving the pick, and never let the crampon points dig in at high speed.
What are the most common mistakes when attempting a self-arrest?
The biggest mistakes are holding the axe by the shaft only, which gives no leverage, and letting the spike drag instead of the pick. Many people also roll the wrong way, ending up on their back, or keep their head downhill. Another common error is waiting too long to react. Every second of sliding builds speed, so the ice axe self-arrest must start within the first two seconds of a fall.